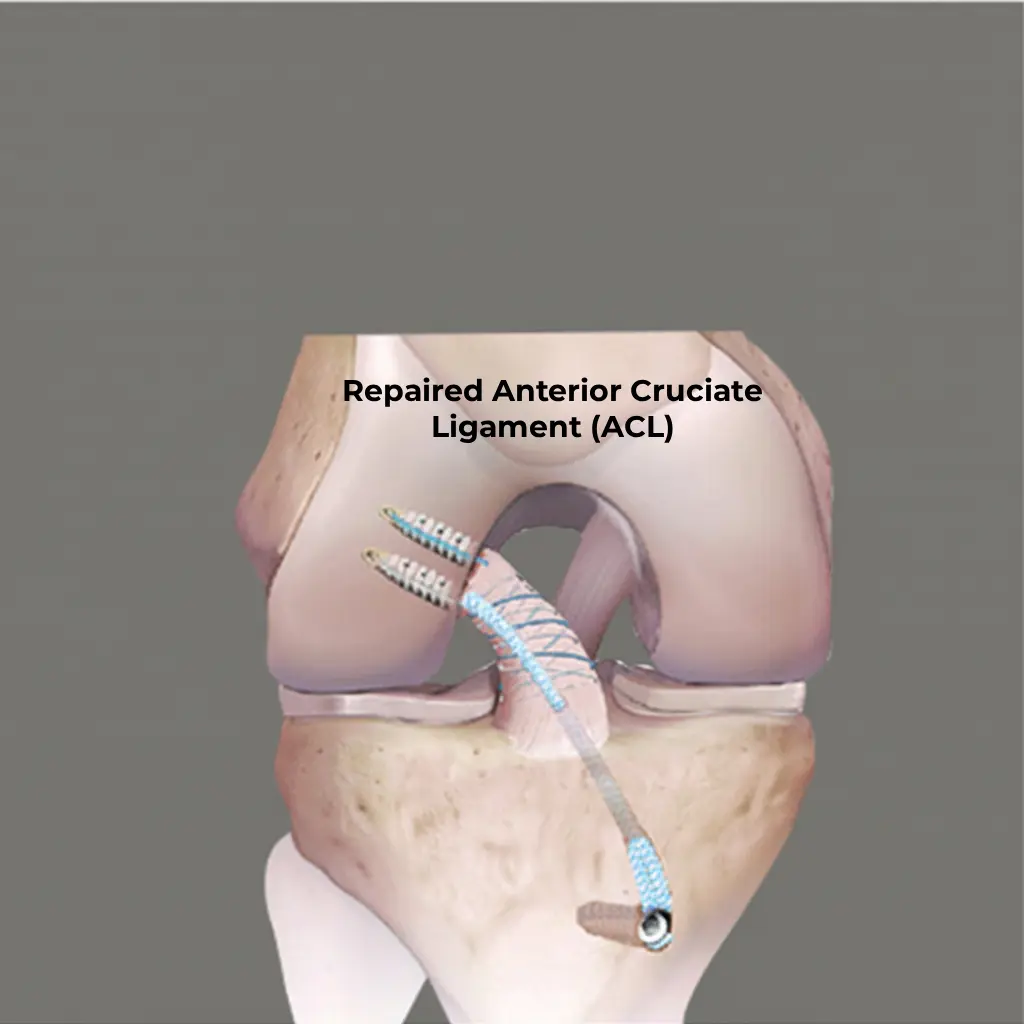
The anterior cruciate ligament (ACL) is one of the most important structures that provide stability to the knee joint. When this ligament is injured or torn, forward movement and rotational control of the knee are compromised. While some ligaments in our body can heal on their own, ACL injuries often require surgery. For many years, the gold standard treatment method has been reconstruction surgery, which involves replacing the torn ligament with a new ligament made from the patient’s own tissue or tendon obtained from a tissue bank. However, with the advancement of modern surgical techniques, ACL repair has also become a successful option in suitable cases.
Add us as a preferred source on GoogleSee our new articles higher in your searchesAddWhat is the Anterior Cruciate Ligament (ACL) and What is its Role in the Knee?
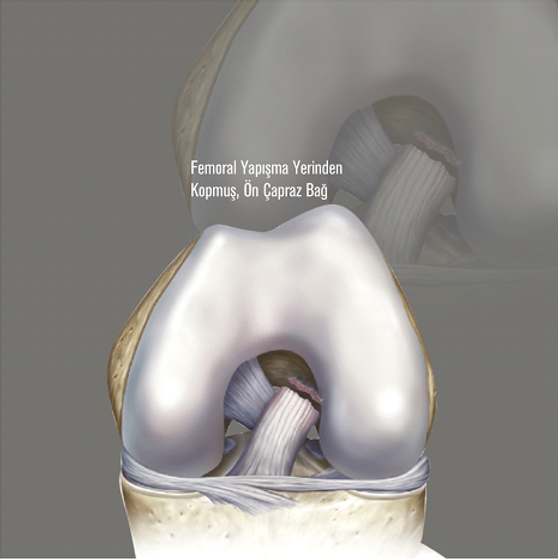
The anterior cruciate ligament (ACL) is one of the most important structures within the knee joint, connecting the thigh bone (femur) to the shin bone (tibia) and providing joint stability. It prevents the bones from sliding forward and backward during knee movement and keeps the joint stable during movements such as sudden stops, changes in direction, and landing after jumping. Together with the menisci and collateral ligaments, it contributes significantly to load-bearing and balanced movement functions.
How Does an Anterior Cruciate Ligament (ACL) Injury Occur?
Anterior cruciate ligament injuries typically occur during movements such as sudden stops, rapid changes in direction, unbalanced landings after jumping, or sudden twisting of the knee. They are more common in contact or high-intensity sports such as football, basketball, handball, volleyball, and skiing. A “popping sensation” in the knee at the moment of injury and swelling developing within a few hours are typical.
Differences Between Anterior Cruciate Ligament Repair and Reconstruction Surgery
Surgical treatment for anterior cruciate ligament injuries can be performed using two main methods: repair or reconstruction.
- Anterior cruciate ligament repair involves reattaching the torn ligament to its anatomical attachment site while preserving its own tissue.
- Anterior cruciate ligament reconstruction involves creating a new ligament using a tendon (autograft) taken from the patient’s own body or a tendon (allograft) obtained from a tissue bank to replace the torn ligament.
Advantages–Disadvantages Comparison
| Feature | Anterior Cruciate Ligament Repair | Anterior Cruciate Ligament Reconstruction |
|---|---|---|
| Surgery duration | Shorter | Longer |
| Tissue usage | Existing ligament is preserved, no additional tendon is taken | Autograft or allograft is required |
| Recovery time | May be faster | Longer rehabilitation process |
| Eligibility criteria | Selected cases (young, fresh injury, tear close to femoral attachment) | Suitable for most patients |
| Risk of re-tear | Low in suitable patients | Low, but risk of graft failure exists |
| Long-term outcome | Successful in suitable patients | High success rate, gold standard |
Which Method is Better?
Both methods have their own advantages. Repair surgery is preferred only in suitable patients and for suitable types of tears. Reconstruction, on the other hand, is a method that has been considered the gold standard for many years and can be applied to a wider group of patients. The decision is made based on factors such as the patient’s age, the type of injury, the location of the tear, and the overall condition of the ligament.
Modern Surgical Techniques and Technological Advances in the Treatment of Anterior Cruciate Ligament Injuries
Anterior cruciate ligament repair has historically had limited success rates, leading to reconstruction surgery being preferred for many years. However, in recent years, the advancement of arthroscopic surgical techniques, progress in biomaterials, and the emergence of new suture systems have brought repair surgery back into focus.
1. Arthroscopic (Closed) Surgery
Modern anterior cruciate ligament repair surgeries are performed using arthroscopic techniques, which involve making small incisions and using a camera. This method allows for:
- Minimal damage is caused during insertion.
- Less tissue trauma occurs.
- The healing process is accelerated and the risk of complications is reduced.
2. Internal Bracing
A special synthetic tape (fiber tape) with high durability is placed over the repaired ligament. This tape is secured on both the femur and tibia bones.
- Its purpose is to reduce the load on the ligament during the healing process and lower the risk of re-tearing.
- It allows for early rehabilitation in athletes.
3. Advanced Sewing Techniques and Materials
The stitches and fastening systems used in old repair methods were not sufficiently durable. Today:
- High-strength suture threads
- Self-absorbable screws
- “Button” systems that secure without damaging the tissue are used.
4. Biological Augmentation
Biological support methods can be applied during or after repair surgery to accelerate healing and increase the biomechanical strength of the ligament:
- PRP (Platelet-Rich Plasma) injection
- Stem cell applications: derived from fat and bone marrow
- Wrapping techniques using biological membranes
These methods can positively influence the recovery process, especially in young and active patients.
Rehabilitation and Return to Sports After Anterior Cruciate Ligament Repair
This method is not a classic anterior cruciate ligament reconstruction surgery, and the rehabilitation protocol is different. Unless the surgeon performing the surgery gives instructions to the contrary, the specific rehabilitation protocol outlined below should be followed. It should be remembered that the rehabilitation program is as important as the surgery itself in achieving a successful outcome after anterior cruciate ligament repair. The exercises to be performed after surgery, the loading plan, and the timing of return to sports ensure both the protection of the repaired ligament and the restoration of the knee’s previous function.
Preoperative Preparation for Anterior Cruciate Ligament Repair Surgery
- The patient should begin home exercises within the first week after surgery. These exercises should be taught to the patient before surgery.
- The exercises should be reviewed during the first physical therapy session after surgery to ensure correct form and frequency.
Weight-Bearing Status After Anterior Cruciate Ligament Repair Surgery
- Initially, partial weight-bearing is applied.
- For the first 4 weeks, partial weight-bearing is applied with the knee brace locked in full extension (0°).
- Starting from the 4th week, with the approval of the physical therapist and surgeon, full weight-bearing at the pain threshold and discontinuation of crutch use can be initiated when the following criteria are met:
- Maintaining a normal walking pattern
- Being pain-free
- Full extension
- Good quadriceps control
- Being able to go up and down stairs without pain or instability
Knee Brace Usage
The adjustable-angle knee brace should be used during weight-bearing activities after surgery:
- For the first 4 weeks, it should be locked at 0° while walking.
- For the first 6 weeks, it should remain locked at 0° while sleeping.
- Starting from the 2nd week, it can be opened up to the angle specified for walking training in a sitting position or during physical therapy.
- In the 4th week, if the patient has regained quadriceps control and feels comfortable, the brace can be used in the open position while applying partial weight (no more than 90° of flexion is allowed during the first 4 weeks).
Range of Motion of the Knee Brace Used After Anterior Cruciate Ligament Repair Surgery
| Time Interval | Permitted Angle Range |
|---|---|
| First 24 hours | 0° locked (locked until the first post-op surgical check-up in adolescents) |
| 0 – 2 weeks | 0° – 45° |
| 2 – 4 weeks | 0° – 90° |
| 4 – 6 weeks | Progress to full range of motion within tolerance |
| 6 – 14 weeks | Transition to functional brace if surgeon deems appropriate (when active range of motion is 0°–≥110°) |
Other Suggestions
- Wound massage: Should not be performed until Phase 3.
- Manual passive joint movement: Should not be performed at all during Phase 1–3 of the protocol.
- CPM (Continuous Passive Motion): Should not be used.
- Driving:
- The patient should not drive until they have stopped taking all narcotic medications.
- Patients who have undergone right leg surgery must be able to bear full weight without crutches and achieve at least 60° knee flexion.
- Those engaged in physical labor: Restrictions are determined according to the surgeon’s recommendations and the relevant physical therapy protocol.
- Muscle strengthening: Only the following methods may be used:
- NMES (Neuromuscular Electrical Stimulation)
- Optionally, low-intensity Blood Flow Restriction (BFR) training in patients with pain or low load tolerance
- If joint stiffness is observed:
- Ensure that pain and swelling are properly controlled.
- Ensure the patient adheres to the recommended rehabilitation protocol for anterior cruciate ligament repair surgery.
Phase 0: Preoperative Physical Therapy and First Week Postoperative
Preoperative Recommendations
Phase Goals: Should be initiated as soon as possible following the initial injury, and the following goals should be achieved preoperatively:
- Achieve full active and passive knee extension
- Knee flexion range of motion should be no more than 10° less than the unaffected side
- No or only very slight joint effusion (fluid) in the knee
- No extension gap during straight leg raise (SLR)
- Quadriceps Strength Index (QI) should be at least 80% of the unaffected side → these values should be recorded for postoperative comparison (to prevent overestimation of strength)
- Home exercises should be taught to the patient/guardian during the final preoperative visit. The importance of rehabilitation compliance should be particularly emphasized.
- Education should be provided on the use of knee braces, crutches, and partial weight-bearing.
Patient Education
- Explaining the importance of preoperative rehabilitation for the best postoperative results
- Explaining what needs to be done in the first 48 hours after surgery
- Projected timeline for return to sports: 9–12 months
- Expected outcomes: Returning to previous sports level is possible, although difficult
Phase 1: Weeks 1–4
Home Program – Under the Supervision of a Physical Therapist & Surgeon Checkup in Weeks 1–2
Important Instructions
- Post-operative instructions and home exercises should be reviewed during the first post-op surgeon visit and during the 1st and 2nd week physical therapy sessions, and their correct application should be re-taught to the patient.
Crutch Use
- Starting on the day of surgery, patients may begin walking with partial weight-bearing (up to 50%).
- The brace should be locked at 0° while walking.
- During flexion exercises, the brace can be opened at the intervals specified in the protocol.
- Criteria for transitioning to full weight-bearing should be met no earlier than the 4th week and no later than the 6th week.
Knee Brace
- It is kept locked at 0° for the first 24 hours.
- After that, the hinged knee brace is adjusted as follows:
- 0–2 weeks: 0°–45° range while sitting and during exercises
- 2–4 weeks: 0°–90° range while sitting and during exercises
- Walking: Locked at 0° for the first 2 weeks; can be opened for step training and daily activities after the 2nd week
- Sleeping: Must be used locked at 0° for the first 4 weeks
Muscle Performance and Exercises
Patients should begin these exercises within the first week. Knee flexion should not exceed the specified angle ranges.
- Extension exercises: Twice daily, 4–5 minutes
- Flexion exercises (e.g., wall sliding): Twice daily, 1–2 sets x 10 repetitions, 5–10 sec hold
- Quadriceps sets: 2–3 times daily, 3 sets x 10 repetitions (Patella upward movement should be checked visually and by palpation)
- Patella mobilizations: Medial-lateral, superior-inferior directions
NMES (Neuromuscular Electrical Stimulation)
- Applied when the knee is in full extension.
- A full tetanic contraction must be achieved in the quadriceps muscle (without fibrillation; upward movement of the patella should be observed).
- The stimulation intensity is increased to the maximum level the patient can tolerate.
- 10–15 repetitions, each contraction lasting 10 seconds, with 50 seconds of rest between repetitions.
- Electrode placement: distal center/medial, proximal center/lateral, wide electrodes should be used.
Cold Application
- Used in conjunction with compression and elevation.
- First 24 hours / until acute inflammation is under control: 15 minutes every hour while awake.
- Afterwards: 3 times a day, 15 minutes.
- Do not sleep while the device is in operation.
- There should always be a layer of fabric between the skin and the device.
Criteria for Transition to Phase 2 (4 Weeks After Surgery)
- Achieving a normal walking pattern
- Pain-free walking
- Good quadriceps control
- Achieving protocol targets for joint range of motion
Phase 2: Weeks 4-8
Goals
- Achieving full knee extension
- Knee flexion range of motion exceeding 90°
- Achieving good quadriceps isometric contraction
- Minimizing pain and swelling
Recommendations
Crutch Use
- With the approval of the physical therapist and surgeon, you may transition from partial weight bearing (PWB) in week 4 → to full weight bearing at the pain threshold (WBAT) and discontinue crutch use.
- The following criteria must be met for this:
- Achievement of a normal walking pattern
- Absence of pain
- Absence of extensor lag (no loss of knee extension during full SLR)
- Good quadriceps control
- Return to a normal walking pattern should be supported with walking exercises in the clinic starting from the 2nd week.
Knee brace
- Weeks 2–4: The knee brace range is set to 0–90°.
- Once 90° flexion is reached, it can be advanced to allow full range of motion.
- When quadriceps control returns, the knee brace can be opened during weight bearing and walking.
- After week 6, use of the knee brace during sleep is discontinued.
Range of Motion (ROM)
- Extension: Low load–long-term stretching (~5 min) → e.g., heel prop. If necessary, additional stretching can be performed by hanging weight on the knee using a bag/pouch (bag hang).
- Patella mobilization: Initially medial–lateral, then superior–inferior. Monitor for effusion and effect on ROM.
- Manual passive flexion should not be performed.
Muscle Activation and Strengthening
- Quadriceps sets should emphasize active participation of all muscle fibers.
- Long arc quadriceps exercises: Performed in the 90°–0° range.
- Straight leg raise (SLR): Should be performed without extensor lag.
- Stair climbing training begins in weeks 4–6.
NMES (Neuromuscular Electrical Stimulation)
- Should be continued until the Quadriceps Limb Symmetry Index reaches ≥ 80%.
Joint Stiffness Management
Stiffness is common in this phase and is usually associated with:
- Fear avoidance,
- Noncompliance with rehabilitation,
- Additional surgical procedures such as concomitant meniscus repair.
Precautions:
- Proper control of pain and swelling
- Ensuring the patient adheres to the protocol
- If the surgeon has recommended a different protocol, consulting with the surgeon before proceeding
Additional recommendations:
- Continuing to perform exercises regularly
- Performing patella mobilizations more frequently and at a more advanced level
- Weighted supine bag hangs
Criteria for Transition to Phase 3 (8 Weeks After Surgery)
- Achievement of full knee extension
- Knee flexion greater than 90°
Phase 3: Weeks 8–12
Goals
- Minimize pain and swelling
- Full knee extension; flexion should be no more than 15° less than the unaffected side
- Good quadriceps control (able to perform SLR with ≥20 repetitions without lag)
- Achieve normal gait pattern
Crutches
- WBAT (weight bearing at pain threshold) continues.
- Criteria for discontinuing crutches:
- Achieving a normal gait pattern
- Being able to safely climb stairs without pain or instability (alternate steps, reciprocal stair climbing)
Knee Brace
- When active range of motion (AROM) in knee flexion is ≥110°, the surgeon may decide to transition to a functional ACL brace if deemed necessary.
- Hinged knee braces or functional knee braces may be used during walking and closed kinetic chain activities (cycling, elliptical, leg press, wall sliding, mini squats, etc.).
Joint Range of Motion (ROM)
- Extension: Low load–long duration (~5 min) stretching → heel prop or weight-bearing stretch (bag hang).
- Flexion: AROM/AAROM exercises → wall sliding, heel sliding, active-assisted flexion in a seated position (manual passive flexion should not be performed).
- Bicycle: Range of motion can be increased with a front-to-back rocking motion (rocking-for-range).
Muscle Activation and Strengthening
- Quadriceps sets (emphasizing activation of the vastus lateralis and vastus medialis in particular).
- SLR exercises without lag.
- Electrical stimulation → Continue until Quadriceps Index (QI) ≥80%.
- Double leg wall slides or mini squats (ensuring the knee does not extend beyond the foot).
- Hamstring sets → Flexion should be performed to the extent tolerated by the patient.
- Hip circumference strengthening → Adduction/abduction in lateral recumbent position, prone hip extension.
- Quadriceps/hamstring co-contraction exercises in supine position.
- Open chain knee extensions → with progressive resistance.
- Stair climbing training.
- Aqua jogging (running in the pool) → can be started from the 8th week onwards.
NMES (Neuromuscular Electrical Stimulation)
- Should be continued until QI ≥80%.
Neuromuscular Control
- Weight transfer exercises
- Joint angle repositioning exercises
Criteria for Transition to Phase 4 (≥12 Weeks After Surgery)
- Ability to perform 20 repetitions of straight leg raises in full extension.
- Achievement of normal gait pattern
- Discontinuation of crutch/immobilizer use
- Joint range of motion: active extension deficit ≤5°, active flexion ≥90°
- Quadriceps Index (QI) within the range of 60–80%
Phase 4: Weeks 12–20
Goals
- Full extension range of motion; flexion up to 10° less than the sound knee
- Increase muscle strength
- Advance neuromuscular re-education exercises
Range of Motion (ROM)
- Low load–long duration stretching (with assistance when needed)
- Heel slides / wall slides
- Heel prop or bag hang – co-contraction and pain receptor response should be minimized
- Bicycle → first rocking motion (rocking-for-range), then pedaling with high saddle height, gradually lowering the saddle as ROM improves
- Flexibility exercises for all major muscle groups
Quadriceps Strengthening
- Quadriceps sets (mini squat / wall squat)
- Step-up exercises
- Leg press, shuttle press (without jumping motion)
- Knee extension exercises (using dynamometer, machine, or weight bag)
Hamstring Strengthening
- Hamstring curl egzersizleri
- Resistive back straight leg raise using resistance band or exercise rope (resistive back SLR)
Strengthening Other Muscle Groups
- Hip adduction/abduction: SLR or device while lying on your side
- Standing heel raises: progress from both legs to one leg
- Seated resistive calf press
- Workouts in all directions with multi-hip machine (with proximal pad positioning)
- In swimming, only flutter kick (straight leg kick)
Neuromuscular Training
- Wobble board, rocker board
- Standing on one foot (with or without equipment)
- Slide board exercises
Cardiopulmonary Exercises
- Bicycle, elliptical, Stairmaster
- Flutter kick in the pool (from the 12th week onwards)
- With surgeon approval and when the following criteria are met, running (on a treadmill or in a protected area) can begin:
- Quadriceps Index (QI) ≥80%
- No joint fluid (effusion)
- Full range of motion
- If these criteria are not met, running should be postponed to Phase 5.
Criteria for Advancing to Phase 5 (≥20 Weeks After Surgery)
- Full range of motion
- Minimal joint fluid and pain
- Functional muscle strength and control in daily activities (QI ≥80%, measured by LSI)
- At least 20 weeks have passed since surgery
Phase 5: Weeks 20–30
Strengthening and Control
Goals
- Maintain full range of motion (ROM)
- Be able to run without pain or swelling
- Be able to jump without pain, swelling, or giving way
Strengthening
- Open-chain knee extension (OKC knee extension)
- Squat exercises
- Leg press
- Hamstring curl
- Step-up/step-down exercises
- Shuttle press
- Resistance training with sports cord
- Wall squats
- Progression to single-leg squats
Agility Drills
- Double-leg jumps → progress to single-leg jumps as tolerated
Neuromuscular Training
- Wobble board, rocker board, roller board exercises
- Perturbation training, device-assisted testing systems, balance exercises on different surfaces
Cardiopulmonary Exercises
- After surgical approval and when the following criteria are met, a running program can be started on a treadmill or in a protected area:
- QI ≥80%
- Only minimal joint fluid (trace effusion)
- Full range of motion
- Cutting or pivoting movements should absolutely not be performed.
- All other cardiopulmonary equipment can be used.
Criteria for Advancing to Phase 6 (≥30 Weeks After Surgery)
- Able to run without increased pain or swelling
- Able to perform neuromuscular and strengthening exercises without difficulty
- Able to balance on one leg for 60 seconds
- Able to achieve 50% of preoperative jump height on the operated leg (brace hop test)
- Complete functional hop tests and obtain surgeon approval
- Quadriceps Index (QI) ≥80%
Phase 6: Weeks 30–36
Advanced Training
Goals
- Be able to perform running patterns at 75% speed without strain
- Be able to perform jumping exercises without difficulty
- Achieve at least 85% of the values of the sound leg in hop tests
- Cincinnati hop tests:
- Single-leg hop for distance
- Triple-hop for distance
- Crossover hop for distance
- 6-meter timed hop
- Cincinnati hop tests:
Strength Training
- Squat exercises
- Lunge exercises
- Plyometric exercises
Agility Drills
- Side shuffling
- Single/double leg hopping
- Carioca (cross-step running)
- Vertical jumps
- Running patterns at 50–75% speed
- Sport-specific drills can be started at 50–75% effort
Neuromuscular Training
- Wobble board, rocker board, roller board exercises
- Perturbation training, device-assisted testing systems
- Balance exercises on different surfaces
Cardiopulmonary Exercises
- Running workouts
- Other cardiopulmonary exercises
Criteria for Transition to Phase 7 (≥36 Weeks After Surgery)
- No pain or instability during maximum vertical jump
- Achieving ≥85% of the sound leg in hop tests
- Being able to run at 85% speed without difficulty
- IKDC Question #10 (Global Assessment of Knee Function) score ≥8
- Demonstrate ≥85% function in functional hop tests and obtain surgeon approval
- Achieve Quadriceps Index (QI) ≥85%
Phase 7: Weeks 36–52 – Return to Sport
Goals
Strengthening
- Achieve quadriceps strength ≥90% of the unaffected leg
- Achieve ≥90% success in hop tests compared to the unaffected leg
- Be able to perform sport-specific training without pain, swelling, or strain
- Squat exercises
- Lunge exercises
- Plyometric exercises
Sport-Specific Activities
- Interval training programs
- Running patterns in soccer
- Sprint exercises
- Direction change drills
- Pivot and drive-in exercises in basketball
- Kicking and passing in soccer
- Spiking in volleyball (spiking)
- Technical/biomechanical analysis: should be performed together with the coach and sports medicine team
Assessment for Return to Sport
- Balance test: ability to balance on one leg for 60 seconds (for both legs, without touching the ground)
- Single-leg squat: Ability to squat to 60°; without internal rotation of the hip or valgus of the knee
- Hop tests: ≥95% of the sound leg in single-leg distance jump
- Quadriceps Index (QI): ≥90%
Criteria for Return to Team Training
- No functional complaints
- Confidence during full-speed running, changing direction, and jumping
- Achieving ≥90% of the unaffected leg in hop tests
- Quadriceps Index (QI) ≥90%
- IKDC Question #10 (Global Assessment of Knee Function) score ≥9
- Approval to return to sports from the surgeon who performed the surgery
Ön Çapraz Tamir Ameliyatı ile İlgili Sık Sorulan Sorular (SSS)
What is anterior cruciate ligament repair?
Anterior cruciate ligament repair is the process of reattaching the torn ligament to its anatomical attachment site while preserving its own tissue.
What is the difference between anterior cruciate ligament repair and reconstruction?
In repair, the existing ligament is preserved, while in reconstruction, a tendon graft is used to create a new ligament in place of the torn ligament.
Can every anterior cruciate ligament injury be repaired?
No. Repair is only suitable in young patients with fresh injuries and ruptures close to the femoral attachment site.
How long does anterior cruciate ligament repair take?
The surgery usually takes between 45 and 60 minutes.
When can I walk after surgery?
Partial weight-bearing usually begins immediately after surgery, while full weight-bearing occurs in about 6 weeks.
When can I return to sports after anterior cruciate ligament repair?
Depending on the sport and the rate of recovery, it is usually possible to return to sports within 6–9 months.
Is there a risk of re-tearing after surgery?
Yes, especially returning to high-intensity sports early or experiencing new trauma increases the risk.
Will my knee become stiff after anterior cruciate ligament repair?
If rehabilitation is inadequate, stiffness (arthrofibrosis) may develop in the knee. Regular exercise reduces this risk.
In which cases is reconstruction preferred over repair?
Reconstruction is preferred when the ligament is completely torn, the sheath is damaged, or the tear is in the middle section.
What is the success rate of anterior cruciate ligament repair?
In suitable patients, the success rate is reported in the literature to be between 70% and 90%.